Closing the Loop on FPGA Development
Background
When I first started playing with Project Icestorm in 2020, support was more intimate than widespread, examples were few and far between, and tools were compiled from source. At this point, however, tools are mature, mostly mainlined in package managers, and well documented.
In this post, we’ll see how these self-contained CLI tools can be easily captured in a sane, lightweight dev environment that allows modern git-ops and software development approaches to “close the loop”, ultimately achieving multiarch builds & unit tests in CI as we would expect in a modern software project.
The New Tools
FPGA development has officially had its GCC moment
Unlike their fully integrated counterparts, open toolchains attack atomic tasks. The new workflow is much more analogous to modern software development
| Tool | Purpose | C/C++ Analogy |
|---|---|---|
| Yosys | Synthesis | Compiler |
| nextpnr | Place and Route | Linker |
| Verilator | Design Simulation | Unit under Test |
| cocotb | Sim Testbench | Unit Test Framework |
This simple Dockerfile gives you a playground for most ICE-40 and ECP-5 parts. Note that we build verilator from source for compatibility with cocotb. You may have compatibility issues if you try to install both with your package manager.
FROM ubuntu:24.04

RUN apt-get update && \
    apt-get install -y --no-install-recommends \
    git \
    build-essential \
    autoconf \
    flex \
    bison \
    libfl2 \
    libfl-dev \
    zlib1g zlib1g-dev \
    help2man \
    perl \
    gcc \
    g++ \
    gdb \
    make \
    meson \
    ninja-build \
    cmake \
    python3 \
    python3-pip \
    python3-venv \
    ca-certificates \
    usbutils \
    yosys \
    nextpnr-ecp5 \
    nextpnr-ice40 \
    fpga-icestorm \
    fpga-trellis \
    gtkwave


RUN git clone https://github.com/verilator/verilator && \
    cd verilator && git checkout v5.044 && autoconf && ./configure && make && make install

RUN python3 -m venv /opt/venv
ENV PATH="/opt/venv/bin:$PATH"
RUN pip install cocotb
Now we’re cooking with containers!
Basic Synthesis
With just those tools, we’re ready to build our designs for both ICE40 and ECP-5 parts.
Here’s our example blinky design. Nice and simple
Note: VHDL is somewhat supported by open tools, but Verilog is the standard of this ecosystem
`default_nettype none

module blinky(CLK, LED);
	input wire CLK;
	output wire LED;

	parameter WIDTH=8;

	reg [WIDTH-1:0]	counter;

	reg display;

	initial counter = 0;
	initial display = 0;

	always @(posedge CLK)
	begin
		counter <= counter +1'b1;

		if (counter[WIDTH-1] == 1)
		begin
      display <= ~display;
      counter <= 0;
		end
	end

	assign LED = display;
endmodule
Just as we can with GCC, we can wrap these tools in a simple Makefile for sanity and repeatability.
BUILD=build/

.PHONY: all flash clean

all: $(BUILD)/blinky.bin

flash: $(BUILD)/blinky.bin
	iceprog $(BUILD)/blinky.bin

$(BUILD)/blinky.json: blinky.v $(BUILD)
	yosys -p 'synth_ice40 -top blinky -json $(BUILD)/blinky.json' blinky.v

$(BUILD)/blinky.asc: $(BUILD)/blinky.json
	nextpnr-ice40 --hx8k --package ct256 --json $(BUILD)/blinky.json --pcf board-ice40.pcf --asc $(BUILD)/blinky.asc --freq 100

$(BUILD)/blinky.bin: $(BUILD)/blinky.asc
	icepack $(BUILD)/blinky.asc $(BUILD)/blinky.bin

$(BUILD):
	mkdir -p $(BUILD)

clean:
	rm -rf $(BUILD)
If your tooling is set up correctly, you should be able to build and even flash to an HX8K dev board if you have one handy, with your pins mapped in a board-ice40.pcf file like so:
set_io CLK J3
set_io LED B5
We got this far without any TCL!
This simplified Makefile demonstrates building for just ICE40, but of course the same rules apply for ECP5 with the appropriate args & next-pnr version.
Sim & Test
Now for the big enchilada, what I consider the most compelling feature of this toolset.
Following cocotb’s quickstart guide, we are trivially able to check our design (which of course, had a bug or two at first) against this simple pytest:
import cocotb
from cocotb.triggers import FallingEdge, Timer

async def tick(dut, cycles: int):
    for i in range(cycles):
        dut.CLK.value=0
        await Timer(1, unit='ns')
        dut.CLK.value=1
        await Timer(1, unit='ns')

@cocotb.test()
async def blinky_test(dut):
    """Validate counter-based blinky"""

    assert dut.LED.value == 0

    await tick(dut, 128 + 1) # The clock cycle after the LED transition

    assert dut.LED.value == 1

    await tick(dut, 128 + 1)

    assert dut.LED.value == 0
Thanks to cocotb’s templated Makefile which handles the sim entirely, we are able to run this test without any custom C++ scaffolding at all. The only extra glue logic necessary was this corresponding test runner which was likewise adapted from their example to my blinky design.
import os
from pathlib import Path

from cocotb_tools.runner import get_runner


def test_my_design_runner():
    sim = os.getenv("SIM", "verilator")

    proj_path = Path(__file__).resolve().parent

    sources = [proj_path / "blinky.v"]

    runner = get_runner(sim)
    runner.build(
        sources=sources,
        hdl_toplevel="blinky",
    )

    runner.test(hdl_toplevel="blinky", test_module="test_blinky")


if __name__ == "__main__":
    test_my_design_runner()
We can also optionally get a cool looking trace out of it and view it with gtkwave

Bringing it together + CI
The full blinky example project, built to serve as a template for further Verilog projects, adds multiarch support and calls the sim/test Makefile from the top level under a make test rule. Due to the simplicity of the build system, wrapping it all in CI is trivial, leaving us with this beautiful end result:
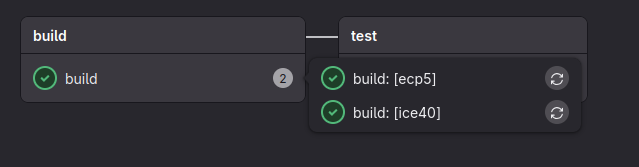
The loop is closed. We’ve achieved a sane, test-driven workflow which facilitates:
- Containerized dev environment
- Repeatable, automatable builds
- Unit tests that don’t suck to write
- A basic CI pipeline
Thanks for reading, and manere curiosus.
-Lemur